Operating System Network
Usually, once you have created your instance, you do not need further configurations to have it connected to an internet network. Once the instance is made and rebooted, the operating system uses DHCP and the Cloud-init configurations to establish the connection. However, when we want to have multiple interfaces or add IPs to the interfaces manually, we might need to affect the operating system network changes.
Interface and Network Configurations for Different Linux Distributions
The configurations can vary for different Linux distributions. Here, we will explain the basic configurations for many of the distributions.
Important Note: In the process of preparing Images or making the OS Cloud Ready, a package titled cloud-init is installed on the OS that provides metadata for the instance. This package provides the ssh key, instance name, and other data on the instance’s boot. It can configure standard network configurations. To make the manual configurations permanent, after the reboot, create your file using 99-custom-networking.cfg and configure it with cloud-init:
$ sudo nano /etc/cloud/cloud.cfg.d/99-custom-networking.cfg
The file content should be set according to the following:
network: {config: disabled}
DNS Configuration
In case your instance is used as a DNS client, then DNS-related requests must be sent to the server. To configure which server will receive such requests in all distributions, go to the /etc/resolv.conf file. In some recent versions of the distributions, this file might be a link to another file, and its content might have more or less network management features. For example, in the latest versions of Ubuntu and Debian, this file is indirectly managed by system-resolved, initscripts, or NetworkManager. In this case, the manual changes will not remain after a reboot.
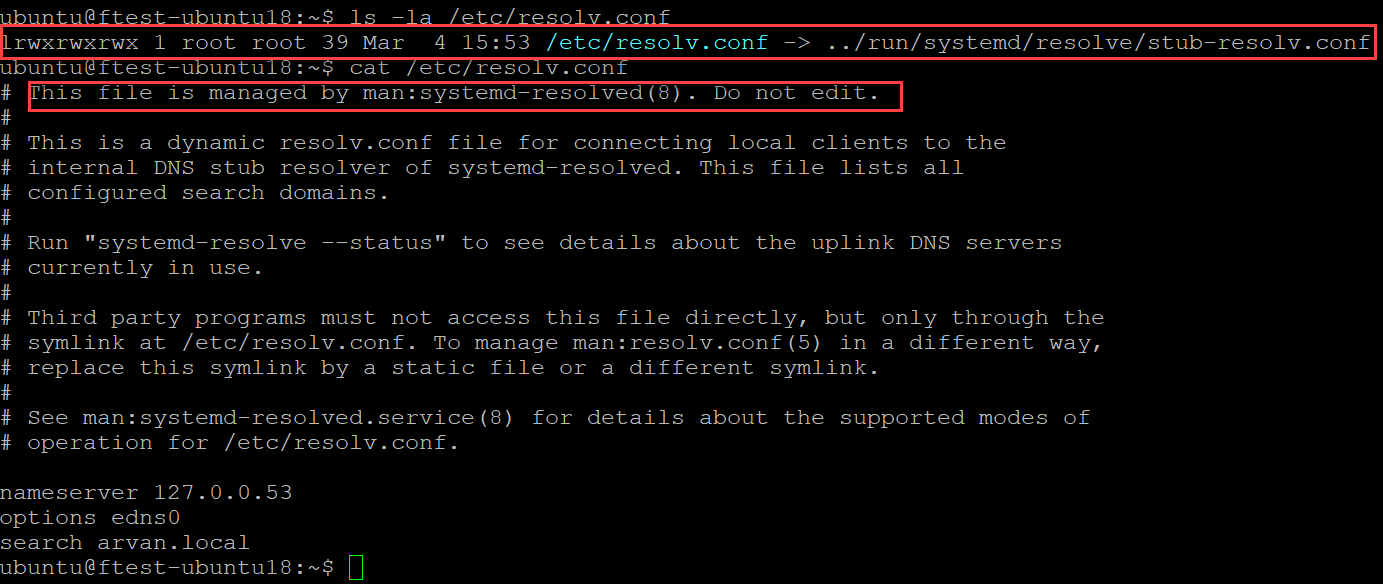
Important Note: even if there are no distributions in the above conditions, your OS might receive the DNS information from DHCP and overwrite previous configurations. One solution is to replace the symbolic link with a new file, with its file being only in the read-only format. For this, follow the instructions below:
$ sudo rm -f /etc/resolv.conf
$ sudo nano /etc/resolv.conf
You need to add your selected nameservers to the file content in this step. For example:
nameserver 8.8.8.8
nameserver 4.2.2.4
$ sudo chattr +i /etc/resolv.conf
To modify this file in the future, you need to deactivate the read-only mode of the file with the following instructions:
$ sudo chattr -i /etc/resolve.conf
Ubuntu and Debian
Other than the methods mentioned, you can use resolvconf package to set configurations. You can install it through this command:
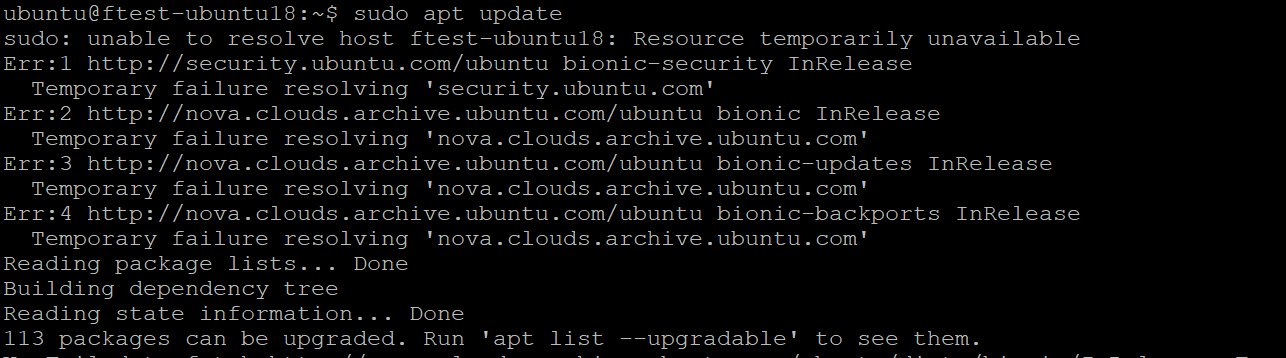
$ sudo apt update
$ sudo apt install resolvconf
In case you face a Name Resolution error, you can temporarily change the nameserver to a responsive one and then continue the installation.
You can edit the following file to configure your nameservers:
$ sudo nano /etc/resolvconf/resolv.conf.d/head
Then activate it with these commands:
$ sudo systemctl start resolvconf.service
$ sudo systemctl enable resolvconf.service
Now, you can check the system status and make sure it is active:
$ sudo systemctl status resolvconf.service

Finally, save your file.
RHEL and Centos

In RedHat-based distributions, with each reboot or restart of the network service, the contents of the resolv.conf file may be overwritten through NetworkManager and DHCP by executing the following scripts.
/etc/sysconfig/network-scripts/ifup-post
/etc/sysconfig/network-scripts/ifdown-post
The first solution can solve your problem, but if you want NetworkManager not to overwrite this file, you can do the following steps:
$ sudo nano /etc/NetworkManager/conf.d/90-dns-none.conf
Enter the values below in the file content:
[main]
dns=none
Then, reload the NetworkManager:
$ sudo systemctl reload NetworkManager
Please note that the same file or a similar one might have already been created through cloud-init in the directory. Therefore, check the directory before creating the file. You can edit the resolv.conf file and make it read-only by chattr command.
Basic IPROUTE2 Commands for Network Configuration
You can use the default iproute2 package to configure the interface settings in different Linux distributions. However, these changes are not permanent and will be removed after every reboot. Some of the useful commands are:
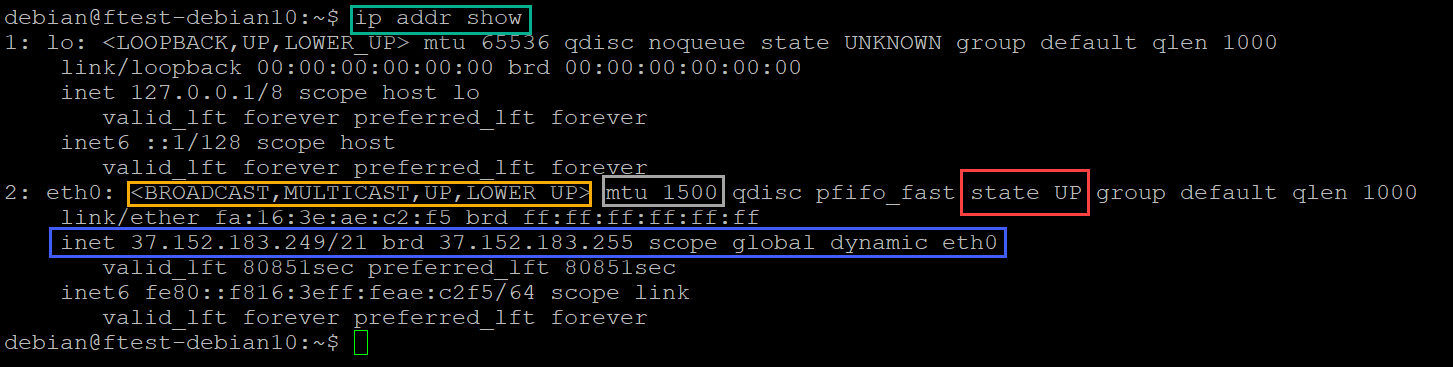
Check Interfaces’ General Status
$ ip addr show
Add or Remove Interface IP
$ sudo ip addr add 192.168.50.5/24 dev eth0
Replace eht0 with the interface name. Add the IP and subnet information. Please note that this will not remove the previous IP and will only add it as the second IP to the selected interface. To delete the IP, follow these instructions:
$ sudo ip addr del 192.168.50.5/24 dev eth0
$ sudo ip addr flush dev eth0
Show Interface Status
$ ip link show

Activate / Deactivate Links
$ ip link set eth0 down
$ ip link set eth0 up
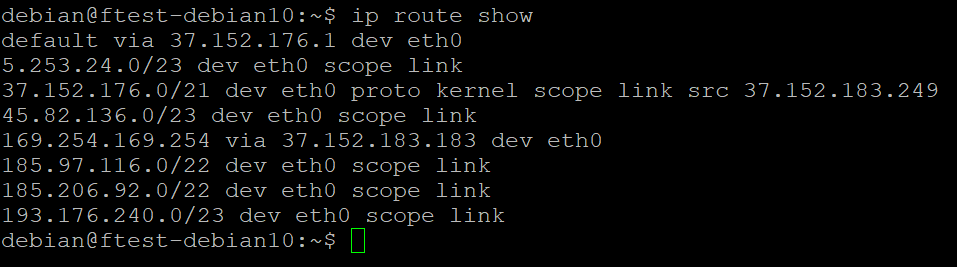
Show Default OS Route Table
$ ip route show
Add or Remove Route
For example, for the 10.10.20.0/24 network, we use eth0 interface, and the next-hop or the IP for the interface that will receive traffic is 192.168.50.100. To delete, you only need to add range. If multiple routes are registered for a range, you can delete a specific one by giving more details, such as the interface name.
sudo ip route add 10.10.20.0/24 via 192.168.50.100 dev eth0
sudo ip route del 10.10.20.0/24
sudo ip route del 10.10.20.0/24 dev eth0
Receiving Information from DHCP During OS Run
Sometimes, when running the OS, there might be a need to receive data on IP, GATEWAY, etc., through DHCP. The best method is to use the dhclient tool. Before using the tool, you need to make sure that the interface in question is active. This is how you use this tool:
$ sudo ip link set dev ethX up
$ sudo ip addr flush dev ethX
$ sudo ip route flush dev ethX
$ sudo dhclient ethX -v
Please note that you need to replace ethX with the interface name.
Instance’s Interface Configurations in Different Linux Distributions
The interface file configurations can be in a different directory in each different distribution. Here, the interface configurations for RedHat-based and Debian distributions are discussed. Netplan configurations for Ubuntu version 18.04 and higher will be discussed here since the configurations are changed and only can be added by writing a config file in yaml format.
Important to note: You need to write down the DHCP received data before changing the general interface from DHCP to Static or Manual.
RHEL/Centos
In instances with RedHat-based OS, you can edit these files:
-
Global Configurations
/etc/sysconfig/network -
Configurations for Each Interface
/etc/sysconfig/network-scripts/ifcfg-[interfacename] -
Route Table Configurations and Interface Route
/etc/sysconfig/network-scripts/route-[interface-name]
The first file has a number of global configurations with the following default values:
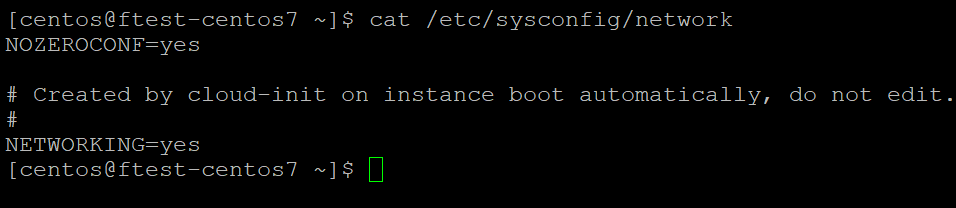
As you see in the image, after the instance’s cloud-init created the files, applying changes will be only temporary if the network’s cloud-init is not deactivated. Make sure that in your manual configurations, the file has the following values.
NETWORKING=yes
NETWORKING_IPV6=no
IPV6INIT=no
NOZEROCONF=yes
NETWORKING shows the activated/deactivated status of the network. It can have values of Yes and No. The next two phrases are for ipv6 deactivation. The nozerconf is used to activate the automatic addition of the 169.254.0.0/255.255.0.0 in the system route.
The next configuration file is for each interface of the instance.
/etc/sysconfig/network-scripts/ifcfg-[interfacename]
Here, the interface name is at the end of each file. For example, if a second interface is added to the instance, you can create and configure a separate file.
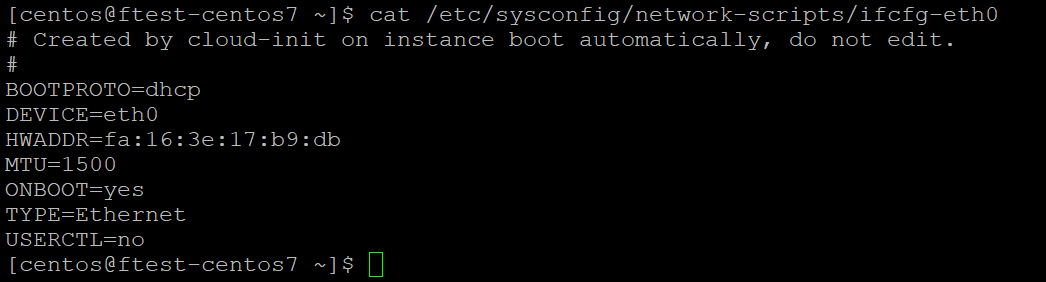
This file is an example of an instance with the above values. Each parameter controls a part. For example:
-
BOOTPRO can include non, bootp, dhcp.
-
DEVICE indicates the interface that is going to be configured.
-
HWADDR shows the MAC address of the interface to be configured.
-
MTU includes numerical values of 1500 for public interfaces and 1450 for private ones.
-
ONBOOT activates/deactivates interface during system boot.
-
TYPE determines the kind of interface.
-
USERCTL determines the non-route users are allowed to make changes to the interface.
-
GATEWAY determines the existence of a gateway on the interface with values equal to default gateway IP.
-
IPADDR determines the interface IP address.
-
NETMASK determines the network’s subnetmask.
Not all of the above-mentioned parameters need to be present in a configuration file, though they can be considered when configuring the settings manually. You can learn about more parameters by reading the documents on these distributions. For example, your instance has two interfaces, one private and the other public. You want the public one to receive data from DHCP and the private one to be configured manually.
Important Note: You need to create the interface file first. If you do not know the interface name, you need to learn the name through an IP link command and then create a file with the given name.
Public interface:
$ sudo nano /etc/sysconfig/network-scripts/ifcfg-eth0
File content:
BOOTPROTO=dhcp
DEVICE=eth0
MTU=1500
ONBOOT=yes
TYPE=Ethernet
USERCTL=no

Private Interface:
$ sudo nano /etc/sysconfig/network-scripts/ifcfg-eth1
File content:
BOOTPROTO="none"
DEVICE=eth1
MTU=1450
IPADDR="192.68.0.100"
NETMASK="255.255.255.0"
ONBOOT=yes
TYPE=Ethernet
USERCTL=no
Important Note: if the instance does not have floating IP and you use the public interface for the internet, you do not need Gateway configurations.
Finally, we can define the configurations below to activate the interface with the new settings:
$ sudo ifdown eth0
$ sudo ifup eth0
Or to restart the Network service:
$ sudo systemctl restart network
Ubuntu and Debian
For the Static configuration of the Debian-based interfaces, edit the file below:
/etc/network/interfaces
In the instance, the file might not have specific content by default, and the interface config files are accessed separately in this directory:
/etc/network/interfaces.d
For the manual configurations, you can do this step:
$ sudo rm -f /etc/network/interfaces.d/*
$ sudo nano /etc/network/interfaces
And for the DHCP settings, follow this command in the file content:
auto ens3
iface ens3 inet dhcp
Or:
auto ens3
iface ens3 inet static
 address 194.5.193.25
 netmask 255.255.254.0
 gateway 194.5.192.1
Set it to Static mode. For example, an instance has two interfaces - one public, and one private. The private network’s configurations are in the STATIC mode, and the config content is like the following:
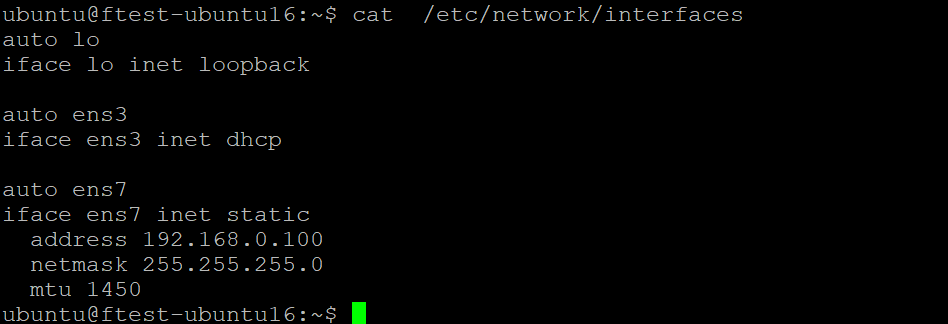
After the configuration, you can reboot or use ifdown, ifup command in the interface and activate your new configurations.
$ sudo ifdown ens3
$ sudo ifup ens3
Ubuntu 18.04 / Netplan configuration
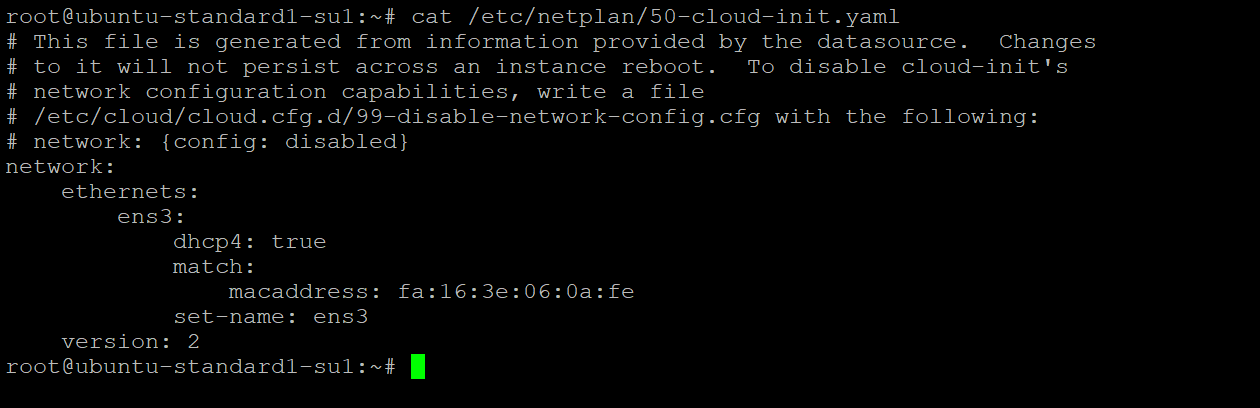
Ubuntu ver. 18.04 or higher use netplan to configure the network card. The netplan configurations are written in a yaml file format where it uses a renderer to create suitable configurations according to the OS and network settings. The config files are in the /etc/netplan/*.yml directory. The Ubuntu instances that Arvancloud provides have default settings which you can manually change like below:
Please note that you must have activated cloud-init so that the network settings do not alter your configurations, and a system reboot would not delete those configurations. The yaml file has a waterfall model, and the space determines the parameters’ connections. Therefore, do not use tab to separate the parameters to avoid errors. Enter the /etc/netplan directory, open the personal configuration file with an editor, and delete the previous file to create a new one:
$ sudo nano /etc/netplan/*.yml
The file’s structure will be like this:
network:
 version: 2
 renderer: networkd
 ethernets:
 DEVICE_NAME:
 dhcp4: yes/no
 addresses: [IP_ADDRESS/NETMASK]
 gateway4: GATEWAY
The config above is a simple example of the network’s card configuration. DEVICE_NAME is the name of the interface that is going to be configured. The name can be found by the IP link command. DHCP4 activates/deactivates the 4th version of DHCP for the interface. address parameter is used to configure interface IP with the possibility to add multiple IPs. gateway parameter configures the gateway for the interface, and it is required for the public instances. Renderer determines your backend on Ubuntu server, which is systemd-networkd. Examples for public and private interface configurations are provided below:

MTU is used for the mtu link, which must be configured along with the macaddress parameter. The macaddress shows the to-be-configured device’s macaddress. If the macaddress is incorrect, no changes are applied to the device. To apply changes, follow this command:
$ sudo netplan apply -d
You will receive an explanation if you receive a syntax error in the yaml structure resulting from the d-switch. If the configurations are correct, they will be applied. Finally, you can restart your Network service:
$ sudo systemctl restart systemd-networkd.service
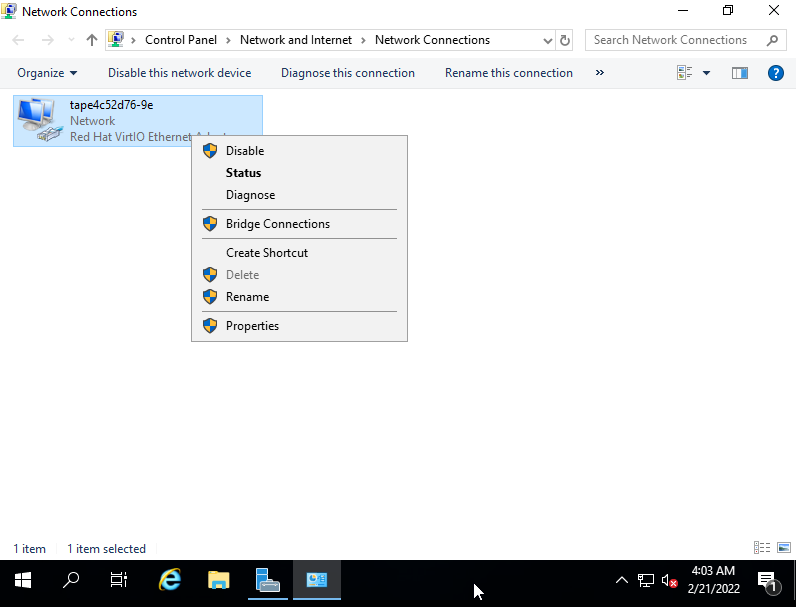
Interface and Network Configurations for Windows
To check and configure the setting on a windows server, run the ncpa.cpl command to open the Network Connections window. Then right-click on the network card and select properties.
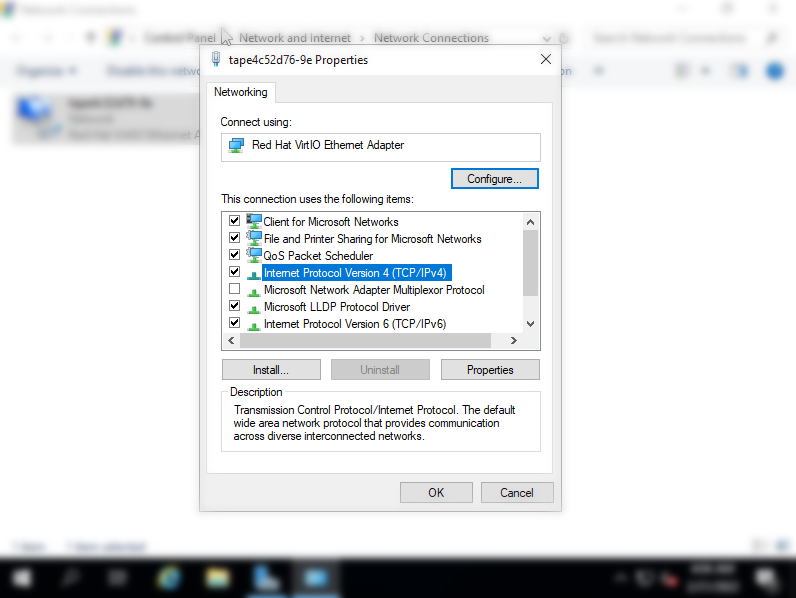
On the next window, select Internet Protocol Version 4 and click on Properties on the next window.
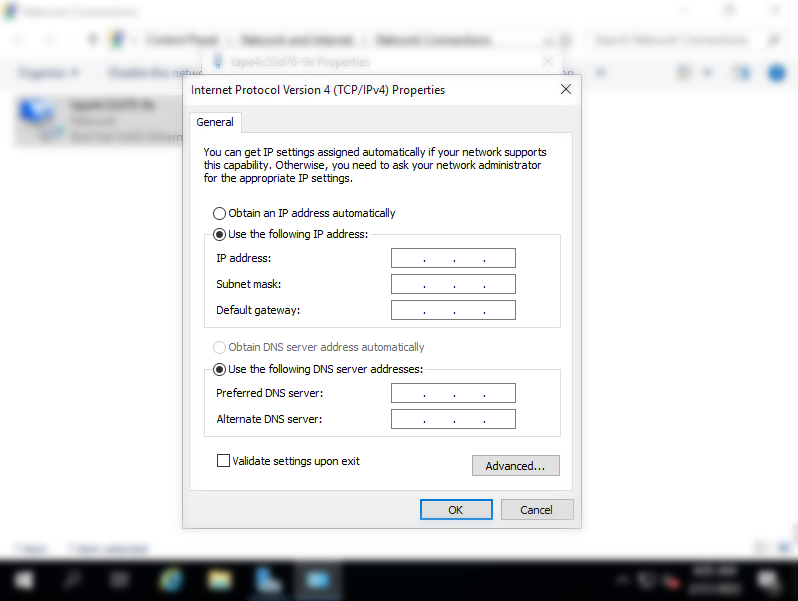
You can change the data for the gateway, subnet mask, and IP on the opened window and save the changes.
To check the network configurations. Double-click on the network card and select details. The network configurations are displayed in the next window.